Reading PDF fields with Python/pdfminer

pdfminer is a PDF data extraction class written completely in Python. You can use it to extract data from PDF fields as well. However, doing so can be a headache since the form entries may have child objects which you should search as well. Most of the sample codes I found from the net did not do this properly or there were problems with the encoding of the strings.

Here is the sample code I wrote to demonstrate getting the data:

from argparse import ArgumentParser

from pdfminer.pdfparser import PDFParser 
from pdfminer.pdfdocument import PDFDocument

from pdfminer.pdftypes import resolve1, PDFObjRef

def load_form(filename):

    """Load pdf form contents into a nested list of name/value tuples"""

    with open(filename, 'rb') as file:
        parser = PDFParser(file)
        doc = PDFDocument(parser)
        return [load_fields(resolve1(f)) for f in
                   resolve1(doc.catalog['AcroForm'])['Fields']]
                   

def load_fields(field, parent_var=None):

    """Recursively load form fields"""

    def escape_utf16(param_str):
        if type(param_str).__name__ == "PSLiteral":
            param_str = str(param_str)
        if isinstance(param_str, basestring) and param_str[:2] == "\xfe\xff":
            # If we have string with UTF-16 BOM remove BOM and null characters
            param_str = param_str[2:].translate(None, "\x00")
        if isinstance(param_str, basestring):
            # Encode all strings to UTF-8 (PDF uses ISO-8859-15)
            return param_str.decode("iso-8859-15").encode("utf-8") 
        return param_str
        
    form = field.get('Kids', None)

    if form:
        # This is a child form, recurse into
        new_parent = field.get('T')
        if parent_var:
            new_parent = parent_var+"."+new_parent
        return [load_fields(resolve1(f), new_parent) for f in form]
    else:
        # Some field types, like signatures, need extra resolving
        if (parent_var):
             return (parent_var+"."+field.get('T'), escape_utf16(resolve1(field.get('V'))))
        else:
             return (field.get('T'), escape_utf16(resolve1(field.get('V'))))


def flatten_form (deep_form):
    """ Flatten given form (from load_form()) to a dictionary """

    dict_form = {}
    
    for this_item in deep_form:
        if isinstance(this_item, list):
            this_flat_item = flatten_form(this_item)
            for this_key in this_flat_item.keys():
               dict_form[this_key] = this_flat_item[this_key]
        else:
            dict_form[this_item[0]] = this_item[1]

    return dict_form
    
def parse_cli():
    """Load command line arguments"""

    parser = ArgumentParser(description='Dump the form contents of a PDF.')

    parser.add_argument('file', metavar='pdf_form',
                    help='PDF Form to dump the contents of')

    return parser.parse_args()


def main():
    args = parse_cli()

    # Read form
    form = load_form(args.file)
    # Make a "flat" dictionary from the form data given by load_form()
    form_flat = flatten_form(form)
    
    # Print form data
    form_keys = form_flat.keys()
    form_keys.sort()
    for this_key in form_keys:
        if isinstance(form_flat[this_key], basestring):
            print this_key+": "+form_flat[this_key]
        elif form_flat[this_key] == None:
            print this_key+": None"
        else:
            print this_key+": Unprintable"
    
if __name__ == '__main__':
    main()

Configuring Chinese Ethernet-controllable 2-relay board

I bought some weeks ago a Ethernet-controllable 2-relay board. While my Chinese Top Seller could not provide any documentation for the item I had to find things myself.

The default IP for the device is 192.168.1.100. To control the device with my Linux device I found a nice Python script sr-201-relay. Since we know the IP of the board we can get rest of the configuration:

$ python sr-201-relay.py 192.168.1.100 config
ip=192.168.1.100
netmask=255.255.255.0
gateway=192.168.1.1
(unknown)=
power_persist=0
version=931
serial=XXXXX50E35000000
dns=192.168.1.1
cloud_server=connect.tutuuu.com
cloud_enabled=0
cloud_password=(not-sent)

Excellent! Now we can change the network settings to suit with my LAN:

$ python sr-201-relay.py 192.168.1.100 gateway=0.0.0.0
$ python sr-201-relay.py 192.168.1.100 dns=0.0.0.0
$ python sr-201-relay.py 192.168.1.100 ip=192.168.2.11
$ python sr-201-relay.py 192.168.1.100 reset

First I tried to make sure the device does not reach Internet and finally I set a static IP from the correct LAN.

The script offers methods to turn relays on (closed) and off (open):

$ python sr-201-relay.py 192.168.2.11 close:1
$ python sr-201-relay.py 192.168.2.11 status
relay status: 1-closed 2-open 3-open 4-open 5-open 6-open 7-open 8-open
$ python sr-201-relay.py 192.168.2.11 open:1
$ python sr-201-relay.py 192.168.2.11 status
relay status: 1-open 2-open 3-open 4-open 5-open 6-open 7-open 8-open


Installing PEAR modules in cPanel environment

My current webhotel does not provide pear client and it tool a while to figure out how to install Pear modules to this environment.

wget http://pear.php.net/go-pear.phar
php go-pear.phar

In my case the default paths were OK. Make sure all paths are writable by you (typically starting with /home/youraccount). Press enter to continue. After installing some packages I got a warning:

WARNING! The include_path defined in the currently used php.ini does not
contain the PEAR PHP directory you just specified:
</home/youraccount/pear/share/pear>
If the specified directory is also not in the include_path used by
your scripts, you will have problems getting any PEAR packages working.

Would you like to alter php.ini </usr/local/lib/php.ini>? [Y/n] :

Since this is not writable by you answer no. Now you’re given an important path:

Configured directory : /home/youraccount/pear/share/pear

You can add this to your php.ini but I decided to add this to my PHP script:

ini_set('include_path', '.'.PATH_SEPARATOR.'/home/youraccount/pear/share/pear');

Now you have the pear client at ~/pear/bin/pear and it can use used e.g. ~/pear/bin/pear install Auth

Merikartat ja peruskartat Androidiin (online)

Näillä ohjeilla voit tehdä Android-tabletille (tai puhelimelle) meri- ja peruskartat, joiden käyttö vaatii verkkoyhteyden. Sinun ei tarvitse ladata karttoja etukäteen. Voit halutessasi ladata kartat myös etukäteen.

Liikenneviraston karttapalvelusta ladattavat merikartat eivät sisällä saarien nimiä tai veneväyliä.

mobac_sample_seamap

  1. Lataa Androidille kartat näyttävä ohjelma OruxMaps.
  2. Käynnistä OruxMaps.
  3. Valitse kartat > Vaihda kartta.
    orux_wms_vaihdakartta
  4. Valitse yläreunasta WMS.
    orux_wms_muokkaawms
  5. Syötä haluamasi kartan URL (myös viimeinen kysymysmerkki) kohtaan “Syötä WMS URL”:
    1. Merikartta: https://julkinen.liikennevirasto.fi/s57/wms?
    2. Peruskartta: tiles.kartat.kapsi.fi/peruskartta?
    3. Taustakartta: tiles.kartat.kapsi.fi/taustakartta?
    4. Ortoilmakuvat: tiles.kartat.kapsi.fi/ortokuva?
  6. Napsauta OK.
  7. Valitse haluamasi karttatasot ja napsauta OK. Merikartassa valitse ainoastaan “Cell Layer”.
    orux_wms_merikartta_tasot
  8. Anna kohtaan “Syötä WMS ominaisuudet” Minimi zoomiksi 0 ja maksimi zoomiksi 20.
  9. Valitse “Välitallennus sallittu”.
  10. Anna kartan nimi -kohtaan lisäämäsi kartan nimi, esim. “Merikartta”. Tämä näkyy jatkossa karttavalikossasi.
  11. Napsauta “Luo”.

Kun olet lisännyt karttojen tiedot, saat ne käyttöön seuraavasti:

  1. Valitse kartat > Vaihda kartta.
    orux_wms_vaihdakartta
  2. Valitse WMS-hakemisto (voit tarvittaessa sulkea KERROKSET ja MULTIMAPS napsauttamalla niitä).
  3. Napsauta lisäämääsi karttaa, esim. WMS:Merikartta.
    orux_wms_valitsemerikartta
  4. Nyt käytössäsi on valitsemasi kartta.
    orux_wms_merikarttatoimii


HST-kortin käyttöönotto: Ubuntu Trusty

Tässä ohjeessa kerrotaan miten HST kortti otetaan käyttöön niin, että sillä voi kirjautua Firefoxilla viranomaisten sähköisiin verkkopalveluihin.

  1. sudo apt-get install opensc
  2. Käynnistä Firefox (esimerkissä 40.0.3)
  3. Edit > Preferences > Advanced > Certificates > Security Devices > Load > Module Filename
    • 32-bittisessä anna: /usr/lib/i386-linux-gnu/opensc-pkcs11.so
    • 64-bittisessä anna: /usr/lib/x86_64-linux-gnu/opensc-pkcs11.so
  4. OK

Lähde: http://www.linux.fi/wiki/HST

Paketista asennettuna opensc kysyy kirjautumisen yhteydessä molemmat PIN-koodit. OpenSC sisältää kirjaston onepin-opensc-pkcs11, joka kysyy vain PIN1:n. Tämän saa vain kääntämällä OpenSC:n uudelleen. Onneksi homma on helppo ja ohjeet ovat hyvät. OpenSC on asennettava ohjeiden mukaisesti /usr -haaraan. /usr/local ei toimi.


Merikartat ja peruskartat Androidiin (offline)

Näillä ohjeilla voit tehdä Android-tabletille (tai puhelimelle) meri- ja peruskartat, joiden käyttö ei vaadi verkkoyhteyttä. Valitsemasi kartat ladataan maksuttomista karttapalveluista tietokoneella ja siirretään tablettiin. Voit siis ladata vain ne alueet, joita oikeasti tulet käyttämään. Jos et halua ladata karttoja etukäteen, katso toinen ohje.

Karttaselaimena käytetään erinomaista OruxMaps-ohjelmistoa, joka on maksullinen.

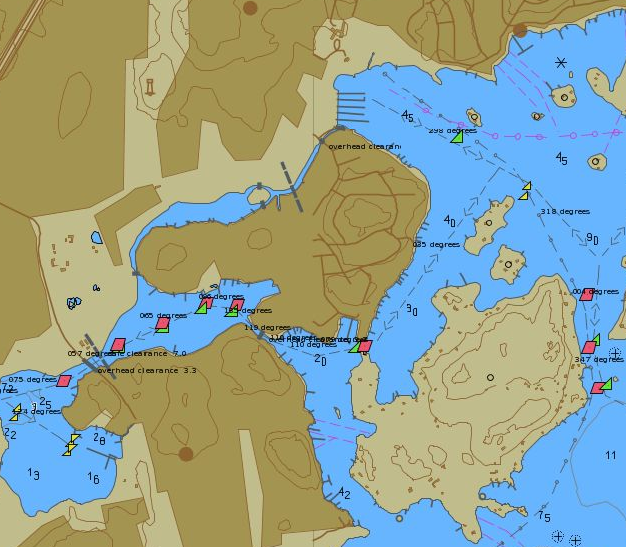
Liikenneviraston karttapalvelusta ladattavat merikartat eivät sisällä saarien nimiä tai veneväyliä, mutta alla oleva asetustiedosto lataa ne Maanmittauslaitoksen rajapinnasta.

mobac_sample_seamap

Jos resepti tuntii työläältä, kokeile vaikka Maastokarttoja.

A) Valmistelevat toimenpiteet

Kartat ladataan maksuttomalla MOBAC-ohjelmalla. Se on kirjoitettu karttatiedostojen lataukseen ja pakkaukseen eri ohjelmille.

  1. MOBAC tarvitsee Javan.
    • Windows: Lataa Java. Se on maksuton.
    • Linux: Tarvitset Javan. OpenJDK käy, esim. Ubuntussa asenna paketti “openjdk-7-jre”.
  2. Lataa MOBAC. Tuloksena on ZIP-tiedosto.
    • Windows: Pura ZIP-tiedosto esim. työpöydälle.
    • Linux: Pura ZIP-tiedosto esim. kotihakemistoosi.
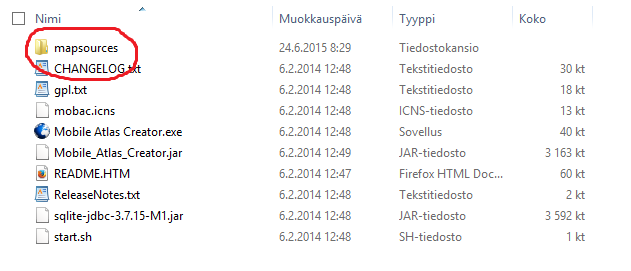
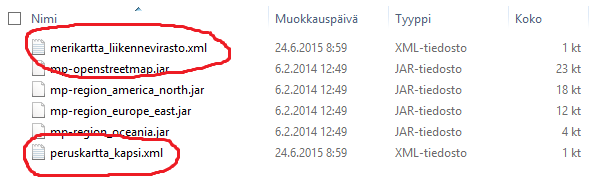
  3. Tarvitset vielä meri- ja peruskarttojen määrittelytiedostot. Löydät ne tästä tiedostosta. Pura tiedostot MOBAC-ohjelman hakemistoon “mapsources”:
    mobac_mapsources1 mobac_mapsources2

B) Valitse ja lataa kartat

MOBAC-ohjelman toimintaperiaate on yksinkertainen. Sen avulla voit tehdä atlaksia (karttakokoelmia), jotka sisältävät yhden tai useampia suorakaiteen muotoisia karttoja.

  1. Käynnistä MOBAC:
    • Windows: Kaksoisnapsauta MOBAC-ohjelman hakemistosta löytyvää tiedostoa “Mobile Atlas Creator.exe”
    • Linux: Aja “start.sh”, esim. terminaalissa “sh start.sh”.
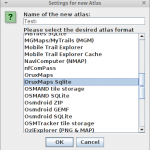
  2. Anna ensimmäiselle atlakselle jokin kuvaava nimi tai esim. “Testi”. Valitse formaatiksi “OruxMaps Sqlite”.
    mobac_name_atlas
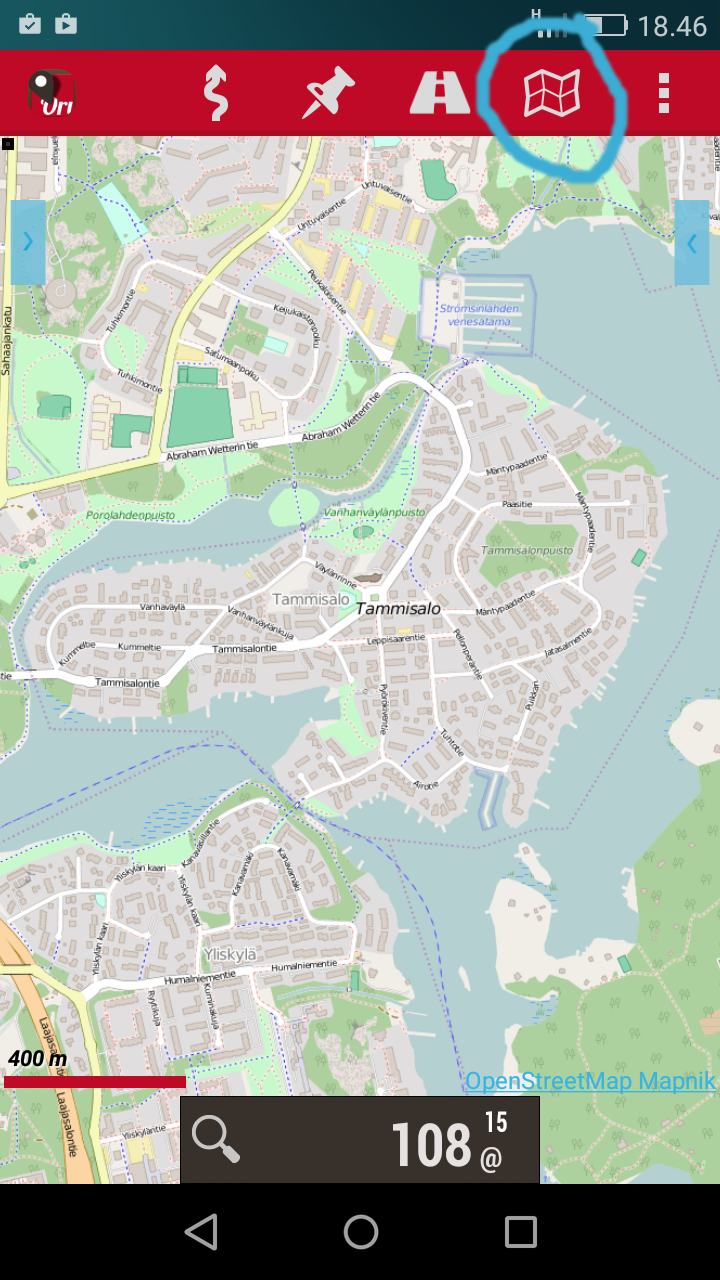
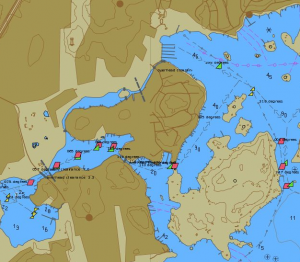
  3. Oletuksena sinulle näytetään karttaa “OpenStreetMap MapQuest” (ks. vasemman ylänurkan Map Source -valinta). Siirry tämän kartan avulla haluamallesi alueelle (esim. Suomenlahdelle).
    • Liikuta karttaa pitämällä hiiren kakkosnappia alhaalla.
    • Zoomaa hiiren rullalla tai näytön yläreunassa näkyvällä zoom-valitsijalla.
      mobac_goto_finland
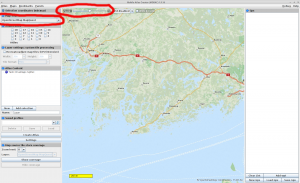
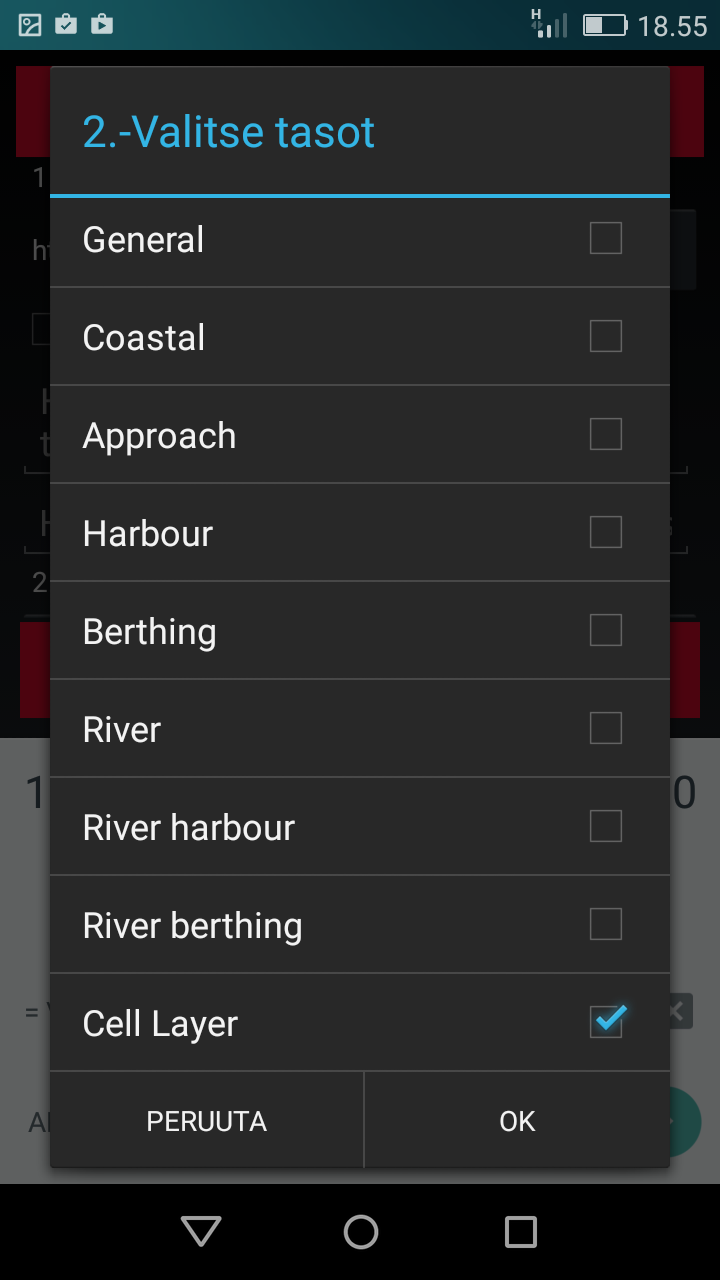
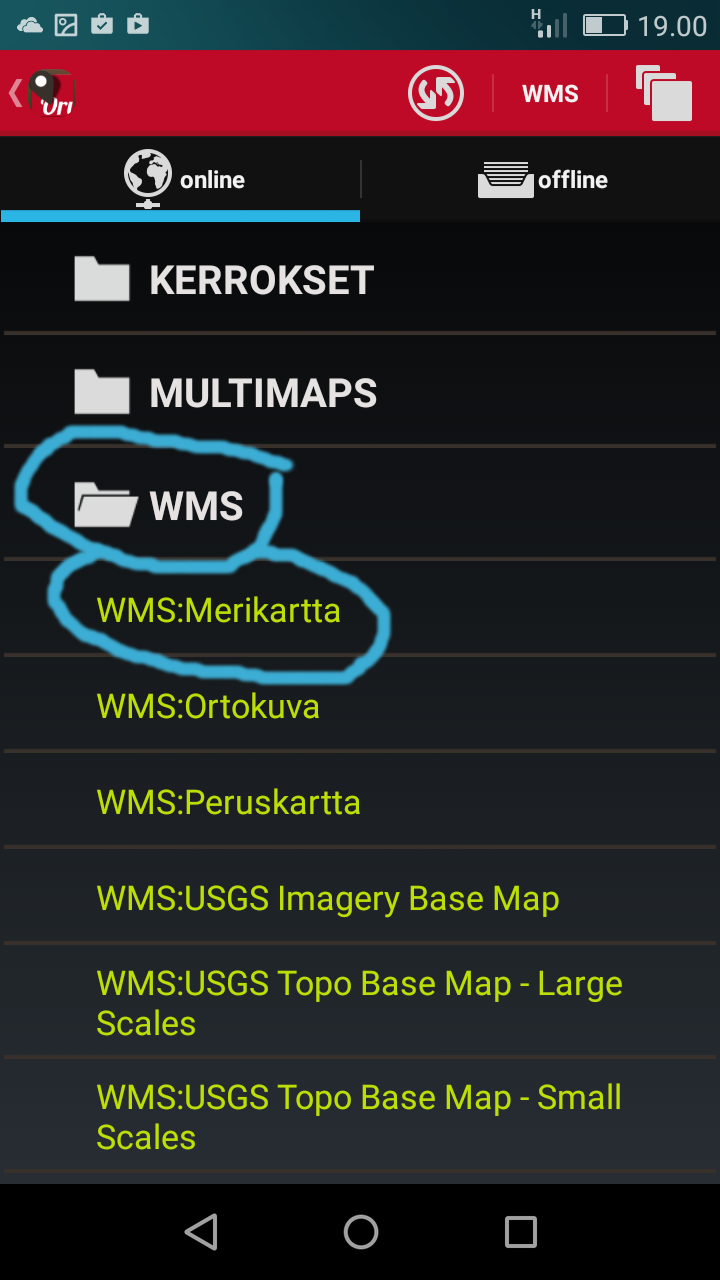
  4. Kun olet oikealla alueella ja zoom levelillä 10, valitse Map Source -valinnalla “Merikartta Liikennevirasto S57”.
  5. Rajaa haluamasi alueet (hiiren vasen näppäin), valitse zoom levelit ja valinta atlakseen (valinnan jälkeen vasemmalta Add selection).
    • Valitut alueet (selection) vastaavat ikään kuin karttalehtiä, kun taas atlakset ovat kartastoja.
    • Tabletin ohjelma osaa valita automaattisesti oikean karttalehden.
    • Mitä isomman zoom levelin (vasen ylänurkka, 0-18) otat mukaan, sen enemmän tilaa kartta-aineisto vie (ja kartan tekeminen kestää). Kannattaa kokeilla jättää levelit 15-18 pois, niin säästyy tabletilta levytilaa.
      mobac_select_layer
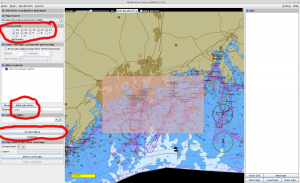
  6. Kun olet tyytyväinen atlakseen napsauta “Create atlas”. Se lataa valitsemasi kartat . Tämä kestää kauan, koska karttatiilet (kartan palaset) haetaan yksitellen palvelimelta. Mitä isompia zoom leveleitä olet valinnut selectioneihin, sen enemmän ladattavaa on.
  7. Valmis tavara tulee mobac-ohjelman hakemistoon “atlases”, jossa on alihakemisto kaikille tehdyille atlaksille.

C) Kartat Androidiin

Tässä vaiheessa olet tehnyt tietokoneella haluamasi kartat. Viimeisessä vaiheessa näytät kartat tabletissa.

  1. Lataa Androidille kartat näyttävä ohjelma OruxMaps.
  2. Käynnistä OruxMaps, jotta se tekee karttahakemistot tabletille. Voit sulkea OruxMapsin saman tien.
  3. Seuraavaksi voit siirtää valmiit kartat MOBAC-ohjelman hakemistosta “atlases” tabletille.
    • Näet tabletin hakemiston seuraavasti: Asetukset (kolme pistettä näytön ylänurkassa) > Kaikki asetukset > Kartat > Kartat hakemisto: esim. “/storage/emulated/0/oruxmaps/mapfiles/”.
    • Voit tehdä siirron esim. muistikortin tai Google Driven avulla. Kätevä apuväline tässä on Cheetah Mobilen File Manager.
  4. OruxMapsissa karttavalikko (karttaikoni) > Switch map > Offline > oma Atlaksesi jokin layer. Jos karttasi ei näy, paina yläreunan reload-painiketta.

D) OruxMapsin käyttö

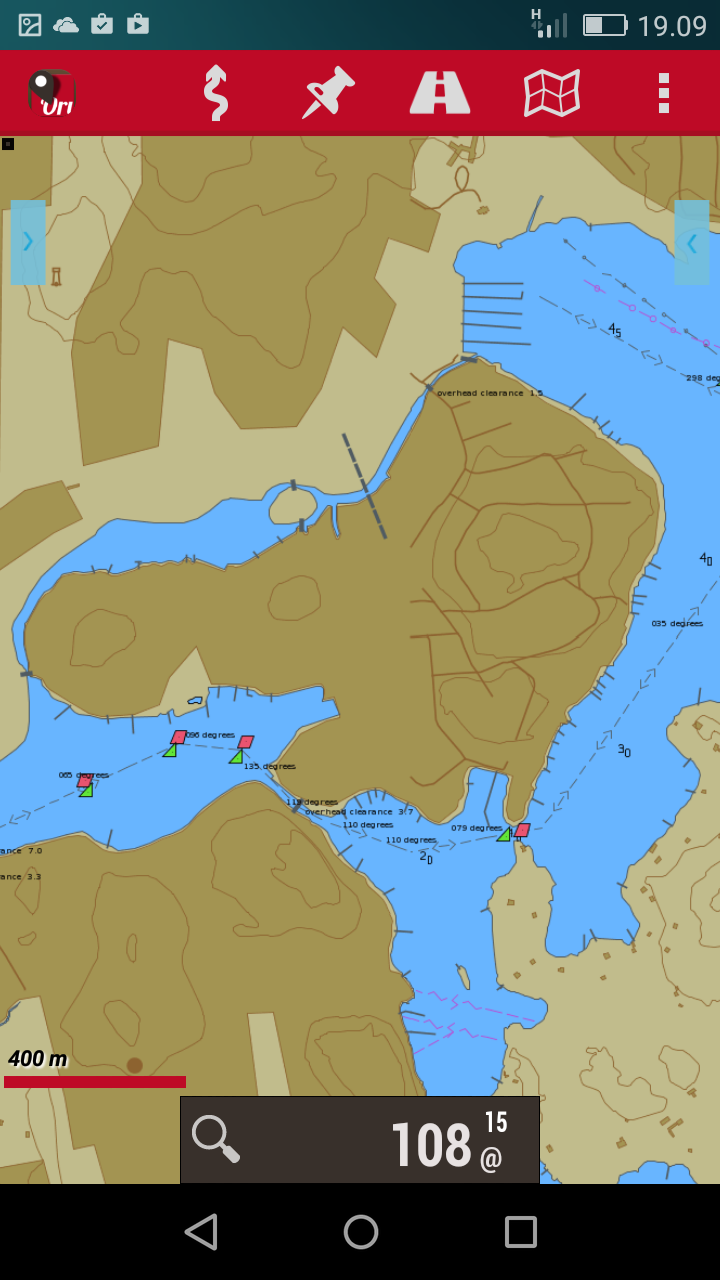
OruxMapsissa on tärkeä säätää karttojen zoom-tasot oman päätelaitteen näytölle sopivaksi. Zoom-tasot näkyvät näytön oikeassa alanurkassa:

oruxmaps_zoomlevel

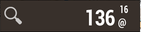
Zoom level on 16, joka on suurennettu digitaalisella zoomilla 136%:iin. Tässä näkyvät zoom levelit ovat samoja, jotka näkyvät MOBAC-karttoja tehdessä.

  • Zoom leveliä voi vaihtaa nipistämällä karttaa kahdella sormella.
  • Digital zoomia voi säätää äänenvoimakkuusnäppäimillä.

Pieni digital zoom auttaa, jotta karttamerkit näkyy sujuvasti. Zoom-asetuksia voi säätää: Asetukset (kolme pistettä näytön ylänurkassa) > Kaikki asetukset > Kartat > Zoom asetukset:

  • Pyöritys ele: Ota tämä pois päältä, jos et halua kääntää karttoja.
  • Äänenv. näppäimet: Valitse tämä, niin voit säätää digitaalisia zoomeja äänenvoimakkuuksilla.
  • Viimeistele nipistys zoom: Valitse tämä, niin zoom level vaihtuu loogisesti.


Getting Rid of Black Borders in Titanfall

After installing the Titanfall FPS game our gamer soon noticed a great annoyance: the screen was aligned in somewhat peculiar way. The screen had a large black border on the left while the screen was missing an equal part on the right.

We tried to change the video settings but none of the presets was functional. However, this solved the problem:

  1. Right click on the desktop > Screen Resolution > Get your current screen resolution (e.g. “1680 x 1050”).
  2. Open up Windows Explorer, and navigate to “C:\users\yourusernamehere\Documents\Respawn” and open the Titanfall folder.
  3. Go into the local folder and open the file titled “videoconfig.txt”.
  4. Set the variables “setting.defaultres” and “setting.defaultresheight” to correct values. In our example they should be

    “setting.defaultres”  “1680”
    “setting.defaultresheight”  “1050”

  5. To full screen you may want to set

    “setting.fullscreen”  “1”
    “setting.nowindowborder”  “0”

Reinstalling GRUB After Windows Update (non-EFI)

This post explains how to revert the GRUB after your Linux (Ubuntu 14.10)/Windows (7) dual-boot workstation boots directly to Windows the Windows update. This procedure is valid for non-EFI (legacy) workstations. For EFI workstations see another post.

  1. Get a sysresccd boot image and boot the workstation from it.
    • Note that you cannot make an bootable USB stick using dd but executing an installation script as explained in the documentation.
    • This recipe was tested on 4.5.3.
  2. Find your Linux root partiton using fdisk:
    1. fdisk /dev/sda (sdb, sdc…)
    2. p (prints the partiton table)
  3. In this example we found the suspected root partition from /dev/sdb2. It has the boot flag on and the partition type is “Linux”.
  4. mkdir /tmp/root
  5. mount /dev/sdb2 /tmp/root
  6. ls /tmp/root (make sure that this contains the root partition)
  7. grub2-install –root-directory=/mnt /dev/sda
  8. reboot
  9. As soon as you get your Ubuntu up and running re-instal grub:
  10. sudo grub-install /dev/sda

kernel-qemu for running RaspBi on QEMU

Some days ago I was in desperate need to run Raspberry Pi on my Ubuntu. As you might expect, there has been several others with similar need and i quickly ran to a number of blog posts explaining how to do this with QEMU. Maybe the best I could find is at http://paulscott.co.za/blog/full-raspberry-pi-raspbian-emulation-with-qemu/.

However, all these documents had a similar drawback. For some reason you cannot just make QEMU to boot from the Raspbian image file but you need a kernel file (often referred as kernel-qemu) which is given with -kernel parameter to QEMU. All these blogs pointed at currently no-existing blog at xecdesign.com and did not explain where this magical kernel file came from.

It appears that you have to do apply a number of patches (armhf? qemu?) to stock kernel to make it boot in QEMU. Of yourse, you have to cross-compile the kernel to ARM.

Finally I found the kernel-qemu inside the pre-packaged QEMU+Raspbian Windows installation at sourceforge. If you just need the kernel-qemu, go ahead and download it. This is probably the one that origins from xecdesign.com. There is another alternative (http://elinux.org/File:ZImage.7z) which gives you 3.6.1 kernel (download).

However, both the two have same drawback. You don’t get modules and they lack some important modules. For example the USB stack does not work.

Block YouTube with iptables

My son uses connects the Internet via our local WLAN network. To help him to just lag on the sofa and browse YouTube for hours we decided to block the video service from his mobile. It appears to be quite easy to block video services using squid but a bit harder to find the streaming server IPs. I have now found a solution which appears to work.

First we want to redirect the pass-through packages from the son’s mobile to the chain “funban”.

$IPTABLES -N funban
$IPTABLES -A FORWARD -m mac --mac-source 11:22:33:aa:bb:cc -j funban

Now we just have to build necessary rules to the chain.

#!/bin/bash
IPTABLES=/sbin/iptables
function block_ips {
 for THIS_IP in $1
 do
 # XXX.XXX.XXX.XXX/XX
 if [[ $THIS_IP =~ ^[0-9]+\.[0-9]+\.[0-9]+\.[0-9]+\/[0-9]+$ ]]; then
 $IPTABLES -A funban -d $THIS_IP -j DROP
 fi
 # XXX.XXX.XXX.XXX
 if [[ $THIS_IP =~ ^[0-9]+\.[0-9]+\.[0-9]+\.[0-9]+$ ]]; then
 $IPTABLES -A funban -d $THIS_IP -j DROP
 fi
 done
}

function accept_ips {
 for THIS_IP in $1
 do
 # XXX.XXX.XXX.XXX/XX
 if [[ $THIS_IP =~ ^[0-9]+\.[0-9]+\.[0-9]+\.[0-9]+\/[0-9]+$ ]]; then
 $IPTABLES -A funban -d $THIS_IP -j ACCEPT
 fi
 # XXX.XXX.XXX.XXX
 if [[ $THIS_IP =~ ^[0-9]+\.[0-9]+\.[0-9]+\.[0-9]+$ ]]; then
 $IPTABLES -A funban -d $THIS_IP -j ACCEPT
 fi
 done
}

function get_ips {
 echo "`dig ${1} A | grep -E '^[^;]' | grep -o -E '[0-9]+\.[0-9]+\.[0-9]+\.[0-9]+'`"
}

# Flush funban chain
$IPTABLES -F funban

# Block all Google-related IPs. The "AS15169" is taken from
# http://networktools.nl/asinfo/google.com
block_ips "`whois -h whois.radb.net -- '-i origin AS15169' | grep ^route\:`"
# Add these IPs to make google search to work (NOTE: This is not sufficient and blocks Google searches)
accept_ips `get_ips www.google.com`

My firewall server runs this script hourly to make sure the changes in the IPs don’t open unexpected possibilities to our YouTube addict. The blockade will surely affect other Google services as well. We possibly have to add more accept_ips commands to the script.