Flashing
Here are brief instructions flashing TP-Link Archer MR600 v2 (EU) to OpenWRT. The PC used to flash is Debian-deriative Linux. You can use whatever TFTP to do this.
Unfortunately the MR600 stock firmware does not start TFTP recover without instructed from serial console. Thus, you have to connect your USB-TTL serial dongle as below:
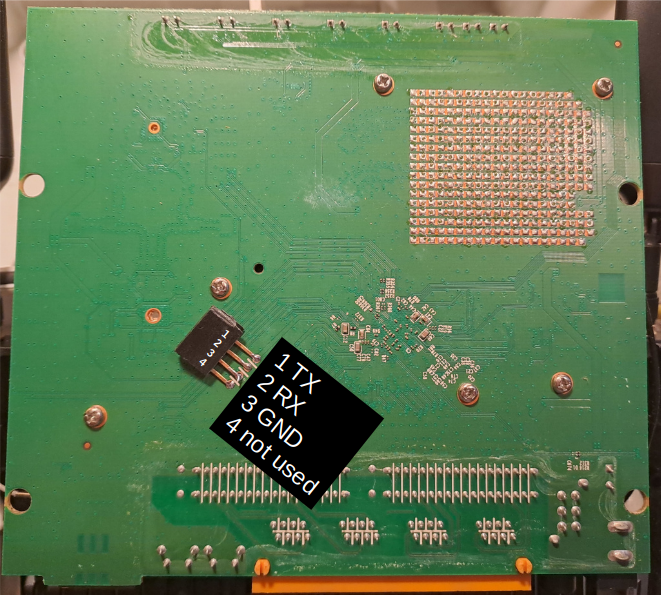
Connect the router TX to your serial dongle RX, router RX to serial dongle TX and GND to GND. Set the serial speed to 115200 and disable the hardware flow control (if applicable).
Once you have the serial console you can continue to the flashing:
- Install TFTP server tftpd-hpa:
sudo apt install tftpd-hpa
- Get the “Firmware OpenWrt Install URL” from MR600 device page.
- Copy the downloaded file to TFTP server (make sure the final filename is “test.bin”):
sudo mv openwrt-24.10.0-ramips-mt7621-tplink_mr600-v2-eu-initramfs-kernel.bin /srv/tftp/test.bin
- Make sure the TFTP server can read the file
sudo chown tftp.tftp /srv/tftp/*
- Power off the router and disconnect all ethernet cables except the one which is connected to your PC.
- Set your ethernet IP to 192.168.0.5, netmask 255.255.255.0 (eth0 is my ethernet device):
sudo ifconfig eth0 192.168.0.5/24
- Now you should be able to download the firmware file from your server:
curl -O tftp://192.168.0.5/test.bin
- Make sure your serial console is now connected. Power the router up and press “t”, which should not give you the U-boot prompt:
4: System Enter Boot Command Line Interface.
U-Boot 1.1.3 (Feb 8 2021 - 16:37:49)
MT7621 #
- Give command “tftpboot”. This should download the temporary kernel from your TFTP server.
MT7621 # tftpboot
- Give command “bootm”. This should boot the downloaded image. Wait the kernel to boot and finally activate the device console. This should give you the OpenWrt logo and root command line:
## Booting image at 84000200 ...Now the OpenWrt kernel boots. Press enter to activate the device console: BusyBox v1.36.1 (2025-02-03 23:09:37 UTC) built-in shell (ash) _______ ________ __ | |.-----.-----.-----.| | | |.----.| |_ | - || _ | -__| || | | || _|| _| |_______|| __|_____|__|__||________||__| |____| |__| W I R E L E S S F R E E D O M ----------------------------------------------------- OpenWrt 24.10.0, r28427-6df0e3d02a ----------------------------------------------------- === WARNING! ===================================== There is no root password defined on this device! Use the "passwd" command to set up a new password in order to prevent unauthorized SSH logins. -------------------------------------------------- root@OpenWrt:~# - Download the sysupgrade image. Again, you’ll find it from the device page.
wget https://downloads.openwrt.org/releases/24.10.0/targets/ramips/mt7621/openwrt-24.10.0-ramips-mt7621-tplink_mr600-v2-eu-squashfs-sysupgrade.bin
- Copy the sysupgrade image to the router using scp.
scp openwrt-24.10.0-ramips-mt7621-tplink_mr600-v2-eu-squashfs-sysupgrade.bin root@192.168.1.1:/tmp/
- If you cannot open the connection to the router, change your IP and netmask:
sudo ifconfig eth0 192.168.1.5/24
- Finally, do the system upgrade by issuing the command in the router command line. You can do this by using the serial console or by connecting to the router via ssh (ssh root@192.168.1.1):
sysupgrade -v /tmp/sysupgrade.bin
- After the router has rebooted you should be able to disconnect the ethernet cable and plug it in again. The router DHCP server should provide the IP settings to the PC.
Configuring
The default configuration has ethernet WAN port with three LAN ports. The configuration is straightforward:
- Connect to the router using ethernet.
- Log in to http://192.168.1.1 with empty password and set the root password.
- Configure the wireless network (SSID and passkey) for 2,4 and 5 GHz.